
OpenComet v1.3 documentation
Basic installation
Installing OpenComet in ImageJ
1) Download and install ImageJ.
2) Download the latest version of "OpenComet plugin" from the Downloads page and extract the zip file.
3) Browse for the extacted OpenComet_.jar and copy the file.
4)
Browse to the installation folder of ImageJ and paste OpenComet_.jar into the plugins folder.*
5) When ImageJ is launched, OpenComet will appear under the Plugins
menu.
Further installation methods
OpenComet is released in several different packages, which can be obtained from the Downloads page.
Installing OpenComet in ImageJ (Alternative method)
1) Download and install ImageJ.
2) Download the latest version of "OpenComet plugin" from the Downloads page and extract the zip file.
3) Launch ImageJ and from the menu choose Plugins / Install...
4) Browse for the extracted OpenComet_.jar and click Open.
5) ImageJ offers to save the OpenComet_.jar in its own plugins folder. Click Save.*
6) OpenComet will now appear in ImageJ under the Plugins
menu.
Installing OpenComet bundled with ImageJ
1) Download the latest version of "OpenComet plugin ImageJ bundle" from the Downloads page and extract the zip file.
2) Launch ImageJ from the extracted folder.
3) OpenComet will appear in ImageJ under the Plugins menu.
Installing OpenComet in Fiji
1) Download and install Fiji.
2) Download the latest version of "OpenComet plugin" from the Downloads page and extract the zip file.
3) Browse for the extacted OpenComet_.jar and copy the file.
4)
Browse to the installation folder of Fiji and paste OpenComet_.jar into the plugins folder.*
5) When Fiji is launched, OpenComet will appear under the Plugins
menu.
Compiling OpenComet from source code in Fiji
(note: we suggest using Fiji instead of ImageJ to compile OpenComet)
1) Download and install Fiji.
2) Download the latest version of "OpenComet plugin and source code" from the Downloads page and extract the zip file.
3) Launch Fiji and choose Plugins / Compile and Run.
4) Browse for the extracted OpenComet_.java and open.
5) The compiled OpenComet will now launch in Fiji.
Installing OpenComet in Micro-Manager
1) Download and install Micro-Manager (Micro-Manager is by default bundled with ImageJ).
2)
Download the latest version of "OpenComet plugin" from the Downloads page and extract the zip file.
3)
Browse for the extracted OpenComet_.jar and copy the file.
4)
Browse to the installation folder of Micro-Manager and paste OpenComet_.jar into the plugins folder.*
5) When Micro-Manager is launched, the ImageJ interface is simultaneously shown. OpenComet will appear in ImageJ under the Plugins
menu.
*You need to have write permission on the folder to be able to paste OpenComet_.jar.
Usage instructions
Manual review and update of analysis results
Live image analysis using OpenComet in Micro-Manager
OpenComet interface and usage
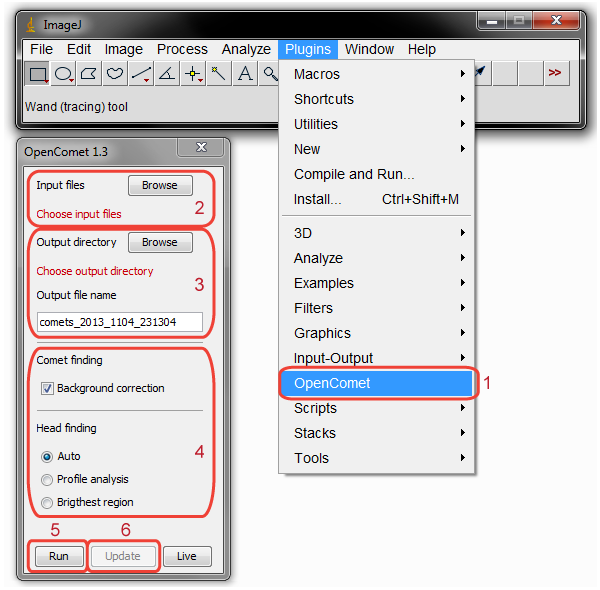
Use the following steps to analyze comet assay images using OpenComet.
1) Run OpenComet plugin – Launch ImageJ, and click on the Plugins menu. If OpenComet is properly installed, it will appear in the plugins list, and will run when clicked.
2) Select images to analyze – Click the Browse button next to the "Input files" label and choose any number of images from a single folder that you want to analyze. More information on choosing input images can be found here.
3) Select output directory – Click the Browse button next to the "Output directory" label and choose an output directory of your choice. Optionally, you can change the name of the output file by changing it under the "Output file name" label. Make sure you have permission to write in the chose output directory (otherwise OpenComet will not be able to save the output). More information on the output generated by OpenComet can be found here.
4) Set analysis options (optional) – In case you want to use the default analysis setting, you do not need to change analysis options. These settings influence the way OpenComet finds and segments comets. More information on the meaning and usage of analysis options can be found here.
5) Run – Click the Run button to perform the analysis for all the chosen input images. The final output images with marked comets and intensity profiles are shown in separate ImageJ windows. The output images, as well as the calculated statistics in a spreadsheet are saved in the output folder. More details about the output generated by OpenComet can be found here.
6) Review and update (optional) – After clicking Run, the output images resulting from the automated analysis are displayed. At this point, you can click on any comet in any of the displayed output images. The clicked comets will be classified as "deleted". After finishing the review process, press the Update button to overwrite the saved output images and create an updated output spreadsheet. More details on the review process can be found here.
OpenComet input
Selecting files
The input files for OpenComet analysis can be selected by clicking on Browse next to the "Input files" label. Any number of images stored in a single folder can be selected in the file selection window. Multiple files can be selected by holding Shift or Control on the keyboard while clicking on files.
Image format
OpenComet accepts all common image formats such as TIF, BMP, JPEG, PNG and others. Normally, comet assay images will contain brightness information on a single channel in the image. If the image contains multiple color channels (such as R, G and B channels), OpenComet automatically selects the channel containing the brightness information.
Comet assay image specifics
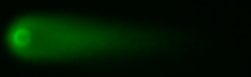
OpenComet requires that comets are oriented along the horizontal axis, the tails extending towards the right hand direction. It is also assumed that the comets appear as bright objects on a dark background. See example below.
If the orientation of images differs from this, we recommend first rotating them in ImageJ or another image processing application, and then analyzing then using OpenComet. OpenComet is tested to perform well with various comet shapes and sizes including ones typical for neutral as well as alkaline comet assay. OpenComet works with a variety of magnifications, and has been tested for images captured between 5x to 40x magnification.
OpenComet analysis
Comet finding
Comet assay images often do not have uniform background illumination. Due to this, the background on one part of the image may be brighter than the comets on another part of the image. It is therefore recommended that if the illumination is non-uniform along the image, background correction is done in order to correctly identify comets in all parts of the image. If the Background correction checkbox is checked (default), OpenComet uses a rolling ball based background subtraction method to adjust the illumination along the image. This correction is done only for the purpose of finding comet shapes, and will not affect the calculation of measured parameters in any way.
During the comet finding process, shapes in the foreground (bright shapes) are separated from the background.
The following shapes are removed during the process
- Very small regions - these usually appear due to noise or are other non-comet objects in the image
- Regions that touch the edge of the image - since accurate measurements cannot be done on clipped comets
- Regions that are highly non-convex - since this usually indicates a set of clumped comets
- Regions that are highly misaligned or non-symmetric with respect to the horizontal axis - since this usually indicates a set of clumped comets
The shapes removed at this stage are marked with a gray outline in the output image, are not assigned an ID number and will not appear in any calculations or statistics.
The following stage of filtering uses shape statistics based on the population of comets in the image to idenitfy comets that are potential outliers.
The following comets are flagged as outliers (since they usually indicate overlapping, clumped comets)
- Comets that have significantly larger or smaller area than the average comet size
- Comets that have significantly larger height than the average comet size
The shapes flagged as outliers at this stage will appear a yellow outline in the output image, are assigned an ID number, are measured, and will also appear in all calculations and statistics.
Head finding
After having identified the comet shapes, OpenComet attempts to find the head of each comet. The Profile analysis option analyzes the brightness of the comet along the horizontal axis. By analyzing the shape of this profile, it finds a characteristic pattern corresponding to the border between the head and the tail. The Brightest region method first finds the set of brightest pixels inside the comet, and considers the center of these pixels as the center of the head. This method may fail if a cell is highly damaged, and the tail is very bright (sometimes brighter than the head). The Auto option (default) first applies the brightest region method to find the head, and if it detects that the method failed, it uses profile analysis to find the correct position of the head.
OpenComet output
OpenComet generates the following outputs
- Output images with overlay for all analyzed images (displayed and saved in output folder)
- Output spreadhseet containing comet measurements and statistics for all analyzed images (saved in output folder)
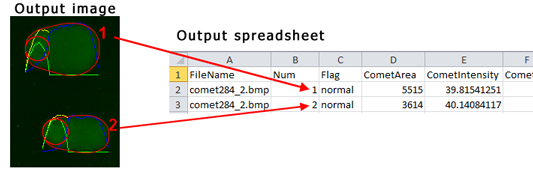
The naming convention for the output is as follows. For instance, if the chose output folder is C:/CometOutput, and an input image is called comet1.tif, then the corresponding output image will be called C:/CometOutput/comet1_out.tif. The name of the output spreadsheet can be modified by setting the output file name. The default file name is based on the current date and time. The default setting would result in an output spreadsheet named C:/CometOutput/comets_2013_1104_231304.xls, which includes the year, month, day, hour, minute and second.
Each comet analyzed by OpenComet has an identification number associated with it.
In addition to the output files, a log window shows textual output on the tasks performed by OpenComet during image analysis. It contains information about the steps and calculations made by OpenComet. All esential information is stored in the output images and output spreadsheet, the log only provides additional diagnostic information and can normally be ignored. The log text is not automatically stored, but can be manually saved as a text file by right clicking on the log window and choosing Save As...
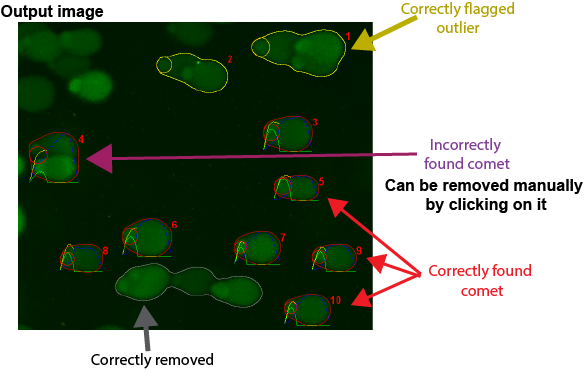
Output images
The intensity profiles and outlines of all the comets and comet heads are shown as an overlay in each image the output images are both displayed and saved. The comets that are in clumps and at the edges are not considered for analysis. From the subset of valid comets, further comet validation steps will classify the comets as below and are represented with different outline.
The various overlaid shapes are color coded, and can be interpreted as follows.
Comet outlines
- RED outline and number: Normal comets
- YELLOW outline and number: Outlier comet
- GRAY outline: Removed shape
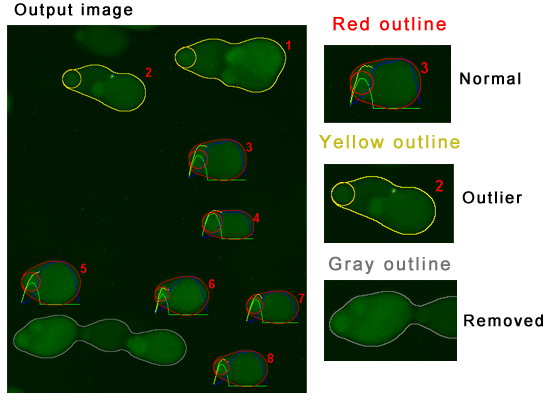
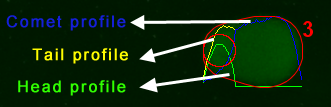
Comet profile
- GREEN profile: Comet head
- YELLOW profile: Comet tail
- BLUE profile: Comet (equal to head plus tail)
Output spreadsheet
An output spreadsheet generated by OpenComet contains several comet measures and their population statistics. In particular, DNA damage can be assessed through the DNA% in tail, Tail moment or Olive moment that are each one column in the output spreadsheet.
Comet parameters computed by OpenComet
| Parameter | Description |
| Comet area | Number of pixels in the comet |
| Comet length | Length of the comet region in pixels |
| Comet DNA content | Sum of pixel intensities inside the comet |
| Comet average intensity | Comet DNA content divided by comet size |
| Head area | Number of pixels inside the head |
| Head diameter | Length of the head in pixels |
| Head DNA content | Sum of pixel intensities inside the head |
| Head average intensity | Head DNA content divided by head size |
| Head DNA % | Head DNA content as a percentage of Comet DNA content |
| Tail area | Number of pixels in the tail |
| Tail length | Length of the tail in pixels |
| Tail DNA content | Sum of pixel intensities inside the tail |
| Tail average | Tail DNA content divided by tail size |
| Tail DNA % | Tail DNA content as a percentage of Comet DNA content |
| Tail moment | Tail length times Tail DNA % |
| Olive moment | DNA % and the distance between the intensity-weighted centroids of head and tail |
One output spreadsheet is generated each time OpenComet is run, and each comet is identified by its input image name and comet number. If multiple images have been selected for analysis, the comet measurements for each of these images will appear in the single output spreadsheet.
To facilitate the analysis process, the spreadsheet also contains population statistics about all measured comets. Statistics such as the mean, median, standard deviation, maximum and minimum values are calculated for all measurement parameters at the end of the file.
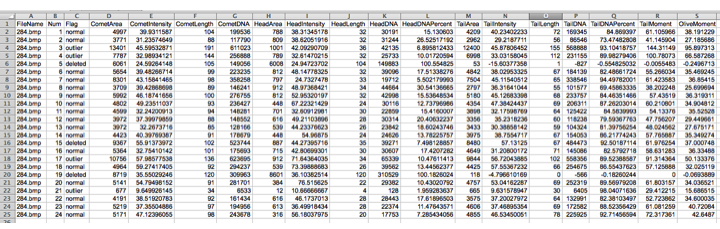
A total of 19 columns (16 comet properties and 3 file and comet details) are in the output data file. The spreadsheet of the above-analyzed images is shown. Note that comets are flagged as normal, outlier or deleted. User can filter the data accordingly for further processing.
Manual review and update of analysis results
After clicking Run, OpenComet analyzes the set of input images and displays the output images marked with color coded outlines and profile curves. While OpenComet attempts to automatically recognize all shapes that are not comets, some shapes may have very similar attributes to actualy comets and thus cannot be recognized to be removed or flagged outlier. Therefore, it can happen that some of the shapes recognized as comets may be incorrect. See below image for an example
At this point it is possble to manually remove any false positive (incorrectly recognized) comet from the output by simply clicking on it. The comet that has been clicked on will still retain its number ID, will still appear in the output spreadsheet flagged as "deleted", and its outline will be gray (instead of the original red or yellow) in the output image. It is important that to overwrite the original output, one must press the Update button. The Update button may be pressed any number of times during review, and the outputs will be updated at each press. When pressing Update, output images will simply be overwritten with the reviewed ones. However, for reference, the original output spreadsheet is retained, and a new, updated one is generated, whose name has the "_update" suffix.
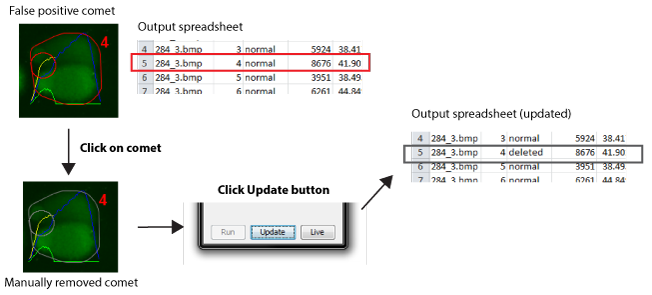
Please note the following properties of the on-click remove functionality:
- It is possible to click on any comet in any of the open output images to be removed
- The order of clicking on comets (and the order images are reviewed) is arbitrary
- Once an output image is closed, the manual review cannot be resumed on that image
- Once a comet is clicked on, it will not be possible to undo the removal
Live image analysis using OpenComet in Micro-Manager
Documentation coming soon.